Stretching Tutorial
Although the Screen Stretch Panel allows you to adjust the brightness and contrast of the image on the screen, sometimes you want to change the data in the image buffer permanently. For example, you might want to adjust an image so it will fit in the 8-bit range of a JPEG file. You might also want to try a "non-linear stretch" to compress the dynamic range of the image. These operations are performed with the Stretch command.
- If you have not already done so, open the DG_HaleBopp.fits file in the Samples directory. (For help on opening files see the Open a File Tutorial).
- On the Process ribbon, Stretch panel, click Stretch.
- Set Permanent Stretch Type to Log, Input Range to Max Pixel, and Output Range to 16 bit (0 - 64K).
- Click Preview. These settings will dramatically compress the dynamic range of the image so that the brightest and faintest parts of the comet are both visible at once.
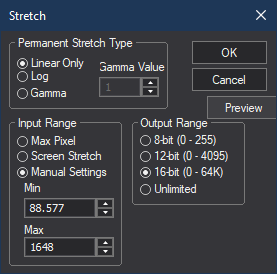
- Perhaps this setting is a bit harsh. We can better control the amount of dynamic range compression by changing the Permanent Stretch Type to Gamma. Set Gamma Value to 0.3 and click Preview.
- You can toggle back and forth between the original image and the processed image by clicking Preview again. When you're happy with the settings click OK.
- Various effects can be achieved with the Stretch command; the following are some suggestions you can try:
- To prepare an image for export to an 8-bit format such as JPG or PNG, set Permanent Stretch Type to Linear Only, Input Range to Screen Stretch, and Output Range to 8 bit. Adjust Screen Stretch to taste, and then click OK to make the change permanent.
- To greatly compress the dynamic range of an image, set Permanent Stretch Type to Log, Input Range to Max Pixel, and Output Range to Unlimited.
- To emphasize faint features, set Permanent Stretch Type to Gamma, Input Range to Max Pixel, and Output Range to Unlimited. Reduce the Gamma Value to below 1.0 and adjust until you are happy with the effect,