
For an introduction to this command please see Adjust Brightness and Contrast Tutorial.
The Screen Stretch panel controls the brightness and contrast of the displayed image without affecting the contents of the stored image. There are several automatic stretch settings. There are two graphical methods to manually control screen stretch: Quick Stretch and Histogram. You can also set the stretch settings using the keyboard. With a few exceptions, the Screen Stretch panel is available even while a processing dialog box is active. The paenl can remain open as a floating toolbox without interfering with other commands.
You can stretch image buffers, or the Preview Image that appears in most processing dialog boxes. Click anywhere on an image to select it, or click anywhere on the dialog box to select the Preview Image. (Note: when the Preview button is down, the preview image has a separate stretch setting; when it is up, the preview image and main image buffer share the same settings). A Full Screen Preview is stretched exactly the same way as the original image in whose window it appears. Full Screen Preview stretch settings are lost as soon as the preview is dismissed or regenerated, typically when you change a control in the processing dialog.
Although the image data pixel values are unaffected by changes to Screen Stretch settings, you should be aware that the stretch mode and limits are saved to FITS files as part of the header, in the keys CSTRETCH, CBLACK, and CWHITE. When the file is loaded into MaxIm DL later, the Screen Stretch Panel will be reset to the state which was in effect when the file was saved, giving the same display appearance.
Once you have selected an image, you can use one of the following methods to stretch it.
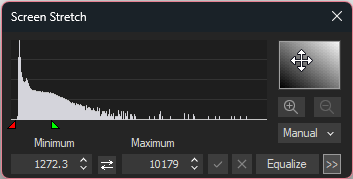
The Minimum field sets the brightness level in the image that corresponds to black on the display. The Maximum field sets the brightness level in the image that corresponds to white (full brightness) on the screen.
Modifying the values in the Minimum and Maximum fields directly will only change the stretch when you press the Enter key or click the Update (check) button. It will force the stretch mode combo box to "Manual".
You may have encountered the terms "background" and "range". Background is equivalent to Minimum, and range is equal to Maximum minus Minimum.

Automatic stretch is the default behavior for a new image. You set the stretch mode using the button-like drop menu (shown set to Medium above). The available settings are:
Low – low contrast setting with dark background
Medium – a medium contrast setting with dark background
High – high contrast setting with dark background
Moon – even higher contrast setting with dark background, slightly saturated pixels
Planet – highest contrast but adjusted so that no feature in the image saturates
Max Val – adjust so that the brightest pixel is set to the maximum brightness, and the zero level is set to black.
Range – adjust so that the brightest pixel is set to the maximum brightness, and the darkest pixel is set to black.
Floating – the user can set the stretch manually, but if the image updates (e.g. during autoguiding or imaging) the Minimum level will adjust to keep the image background approximately constant, but the difference between Minimum and Maximum will remain constant. This is mainly used for monitoring sky conditions during autoguiding and exposure sequences; e.g. a loss of transparence is immediately noticeable.
Manual – user adjustments either using the mouse, histogram, or Minimum and Maximum field.
In addition, the menu contains the Ignore Hot Pixels command. When this item is checked, pixels much brighter than their adjacent neighbors are discounted when computing the histogram. This increases the visibility of faint structure in modes "Low" through "Planet".
Recall that the stretch mode can also be set through the image context menu, which appears when right-clicking on an image.
The Quick Stretch box is located in the upper right corner of the Screen Stretch Panel. To activate quick stretch, first select the image you wish to adjust by clicking on it with the mouse. Point the mouse cursor at the Quick Stretch box and press and hold the left mouse button; it will change into a four-way arrow cursor. Drag the mouse to control the stretch as follows:
Up – increase brightness
Down – decrease brightness
Right – increase contrast
Left – decrease contrast
Monochrome images update in "real time" as the adjustments are made. If you are making very large adjustments you should release the cursor occasionally to allow the software to re-optimize the palette. Color images may update more slowly depending on their size.
Quick stretch can also be performed directly on image windows and Preview windows. Point the mouse cursor at the image you wish to adjust. Hold down the Shift key, then press and hold the left mouse button. Drag the mouse to control the stretch. This allows you to adjust the stretch without using the Screen Stretch dialog.

The histogram is a graph, which shows how many pixels are in the image in different brightness ranges. It is the large box shown on the upper left of the window.
The zero point (black) is at the left side, and the brightest pixel represented is at the right side. The highest point on the graph corresponds to the most common brightness level in the image. (Note that the vertical scale is logarithmic.)
The histogram allows you to conveniently adjust the stretch for any displayed image. The red caret controls the black level (Minimum). Moving the red caret leftwards makes the background of the image darker. The green caret controls the white level (Maximum). Moving the green caret leftward increases the image contrast, but tends to saturate bright parts of the image. Contrast is highest when the two carets are close together. If the carets are switched, the image will appear reversed, like a photographic negative. The carets are affected by the other controls in the window, but they can also be moved with the mouse.
Both carets can be moved together by holding the Shift key down while using the mouse to move the carets. This allows you to keep the contrast constant but change the brightness. Similarly, the carets can be moved in opposite directions by holding the CTRL key down.
When using manual stretch, you can also zoom in on the histogram. Adjust the green and red carets, then click the ![]() button. The histogram will be zoomed in so that the carets are moved to the edge. To zoom out, click the
button. The histogram will be zoomed in so that the carets are moved to the edge. To zoom out, click the ![]() button.
button.
To reverse the carets to display a negative image, click the ![]() button.
button.
Automatic Stretch Setup

Several of the automatic stretch settings can be adjusted. The Low, Medium, and High modes can be set up; Manual, Moon, and Planet cannot.
To change a setting, select the appropriate stretch mode and click the >> button. This expands the dialog box to reveal the auto-stretch settings. Click << to hide this information.
The Minimum Percentile and Maximum Percentile can be adjusted. These affect the corresponding Minimum and Maximum pixel values. To adjust, click either the spin control, or type in new values and click Set. You can also restore the default setting by clicking Default.
To understand the percentile settings, if you set Minimum Percentile to 10%, then the stretch will be adjusted so that 10% of the pixel values are below the red caret. (This convention is for ease of use – the actual calculation is performed using a more sophisticated algorithm than simple percentiles.)
Equalize
After adjusting the settings for one image, you can apply the equivalent settings to every open image. This feature will try to make all of the images appear approximately the same brightness and contrast. It will work best when the images all have similar histogram shapes.
This function is equivalent to the View Ribbon Equalize Screen Stretch function.