MaxDome II systems normally use a solar charging system to maintain the shutter battery, which avoids complex and unreliable electrical contacts between the base and dome. Unfortunately this has some downsides, especially at latitudes where sunlight is limited in the winter months. This can result in the battery running down.
The MaxDome Charging System provides a wireless charging link between the Rotation Controller and the Shutter Controller. The link does not use RF energy; instead, it uses a low frequency magnetic link, similar to the method used for communications between the rotation and shutter boards. This allows for large transmitter / receiver pads that don't require precise alignment.
Since the charger uses magnetic energy, it interferes with the magnetic induction link used to control and monitor the shutter. That's not an issue because the system is only active when the dome is closed and parked. When a command is sent to open the shutter or move the dome, the charging system is automatically turned off, restoring normal operation.
Please note that all of these requirements must be met:
The MaxDome Charging System is intended for 12V lead acid batteries only. Do not use with Lithium Ion or other rechargeable battery types. Improperly charging a Lithium Ion battery can result in a fire.
WARNING: Keep the transmitter and receiver at least 4" / 10 cm away from any steel structural components. Steel can detune the coils, resulting in reduced performance and potentially damage to the transmitter circuitry.
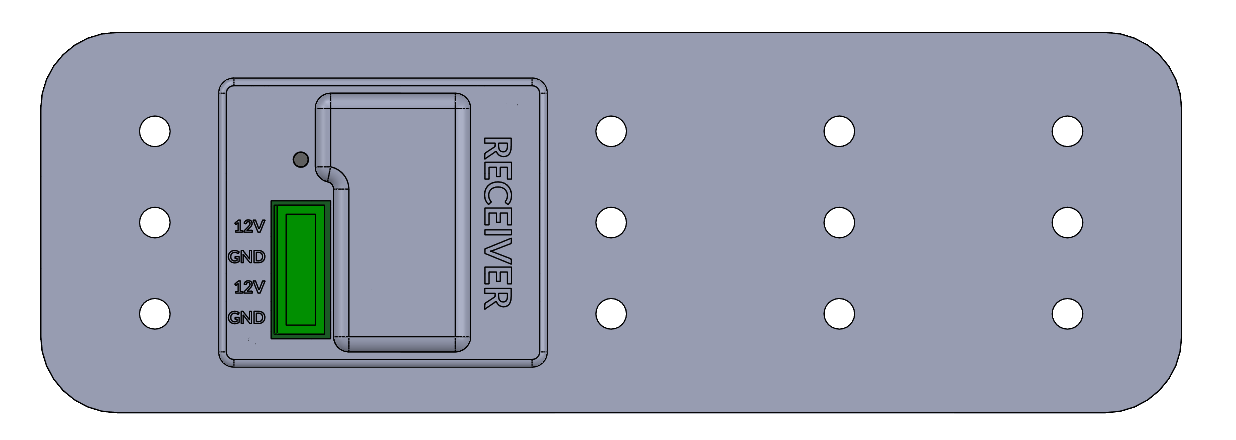
The transmitter and receiver look very similar. The main visible differences are the bulge on the receiver, and of course the word "RECEIVER" or "TRANSMITTER".
The transmitter will be attached to the lower part of the dome, and will connect to the Rotation Controller. The receiver will mount on the rotating part of the dome, and will connect to the Shutter Controller.
Adjustable mounting brackets are provided for both the transmitter and receiver. In some domes, the transmitter can be simply installed on top of the motor drive box.
The flat sides of the transmitter and receiver should be facing each other, about 2.5 mm / 0.1" apart. When the dome is parked they should be aligned. Note that the units will tolerate significant misalignment and still work. That said, it is always best to align as closely as possible during installation, so any subsequent positioning error falls within the operating range.
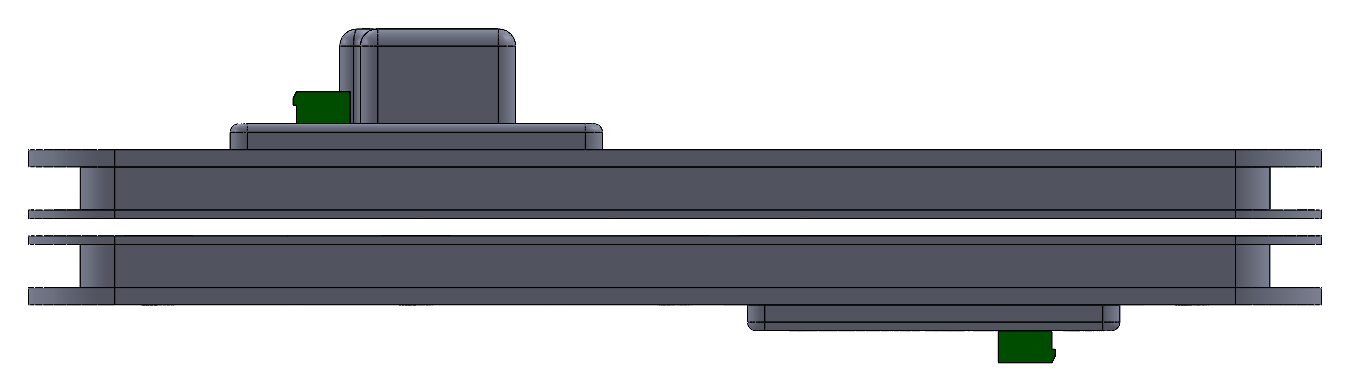
Transmitter (Bottom) and Receiver (Top) Shown at Park Position - Aligned and Nominally 2.5 mm Apart
It is of course extremely important that the two units cannot collide with each other, or any other obstruction within the dome. If they are driven into each other or another object they could be damaged, and such damage is not covered by warranty. Make sure the units are aligned and the mounting screws are properly tightened. Note that there is substantial margin in the charging system, so if necessary the separation can be increased. Also it is not an issue if the dome parking is not perfectly aligned every time; the system will accommodate substantial misalignment.
Four adjustable brackets are provided with the MaxDome Charging System - two for the Transmitter and two for the Receiver. These need to be assembled as shown:
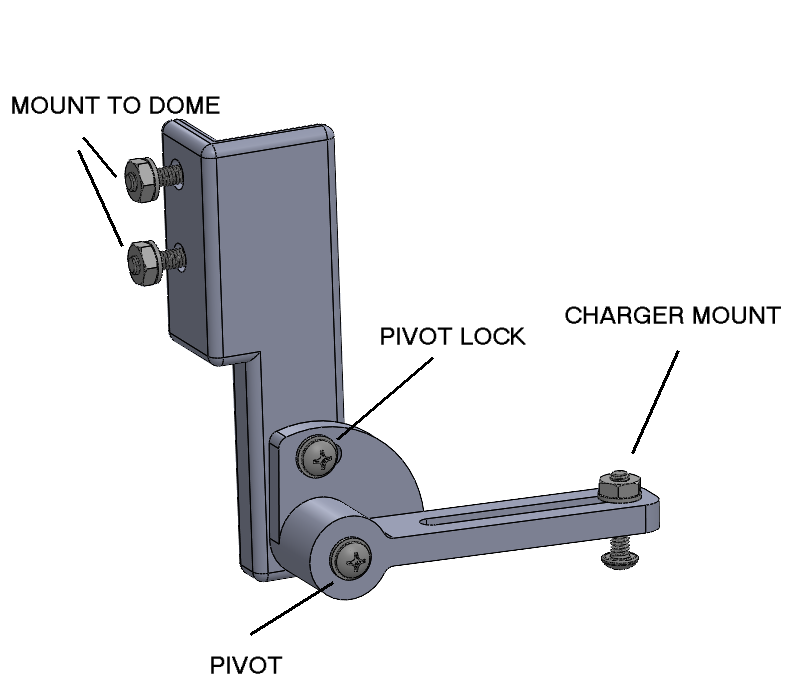
Charger Mounting Bracket (1 of 4)
The mounting brackets are highly adjustable. The Pivot screw allows you to rotate the charger unit to level it. The Pivot Lock and Pivot screw must both be tightened so the Charger (transmitter or receiver) is locked in place. Otherwise you risk a collision if they should shift.
The two Charger units should be mounted approximately 2.5 mm (0.1") apart, with the flat sides facing each other. We recommend installing the Transmitter first. Make sure it's positioned so the Receiver can reach it without running into any other dome hardware as the dome rotates. Also make sure the Transmitter is reasonably level.
Note that only one Charger Mount screw is required on each bracket; this allows the bracket to be slightly rotated to match the curvature of the dome, as shown below. The choice of which mounting hole to use on the Charger unit is up to you. The position of the charger relative to the dome is easily adjusted using the slots and the choice of mounting hole.
IMPORTANT: Use washers under the head of the bolts and under the nuts, except for the head of the Charger Mount screw. The head of the bolt must go into the recess in the surface of the Transmitter / Receiver. If the screw head sticks out then there is a risk of collision.

Position the Receiver above the Transmitter, and adjust the bracket so the two Charger pads are parallel and spaced properly. You want to set up the brackets properly before you drill mounting holes on the dome. After installation you can make small tweaks to the spacing and position if needed using the Pivot and Mounting screws.
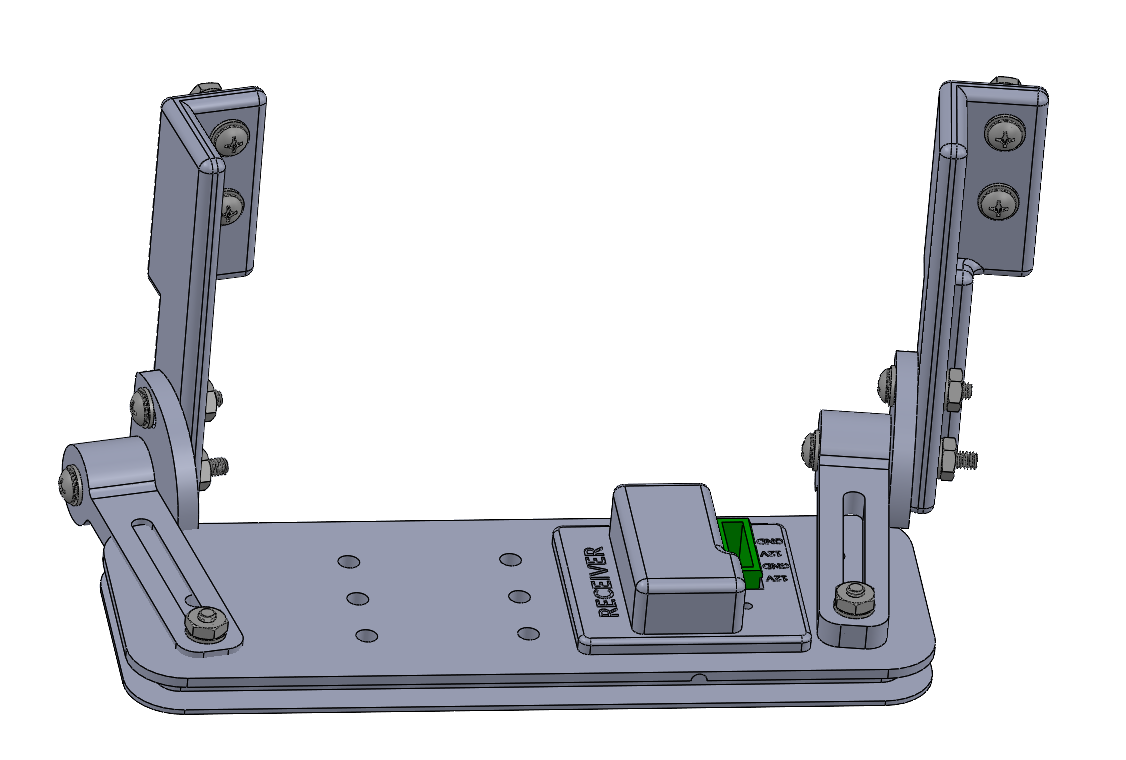
Charger Mounting Brackets Installed on Receiver.
Once the installation is complete, double-check that all the screws are tightened appropriately. While watching carefully rotate the dome fully and make sure the Receiver doesn't run into anything - including the Transmitter.
Since this wireless charging system uses low-frequency magnetic fields, in the same frequency range as the shutter communications link, it can potentially interfere with the communications link between the Rotation Controller and Shutter Controller. Whether interference occurs or not depends on the physical location of the communications loop and the charger.
In order to prevent interference from being a problem, the MaxDome Charging System is automatically powered down when not in use. See Electrical Wiring - Transmitter below.
Each unit has two parallel sets of power and ground pins, marked +12V and GND respectively. For the transmitter, this is a power input.
| From MaxDome II Rotation Card | To Charging System Transmitter |
MOT2+ (For old cards see below) |
12V |
| GND | GND |
Using the MOT2+ terminal on the MaxDome II Rotation Card allows the system to switch on/off the power to the Transmitter.
There is a red status LED on the Transmitter. It will illuminate when the dome is parked and the shutter is closed. At all other times power will be off and the LED will be extinguished. This is normal.
Old Cards: Older model cards, board Revision A through Revision D use MOT- instead of MOT+. Newer Revision E (or higher) cards use MOT+. Newer boards have serial number 3000 and higher, and were first shipped in April 2011.
Each unit has two parallel sets of power and ground pins, marked +12V and GND respectively. For the receiver, this is a power output for charging the battery.
| From Charging System Receiver | To MaxDome II Shutter Card |
| 12V | CHARG (12V INPUT) |
| GND | GND |
Note that CHARG and BATT on the MaxDome II controller card are actually interchangeable, as they are simply connected together on the card. The output of the Receiver is connected directly across the battery - exactly the same as using a solar charging system, but more reliable.
There is a red status LED on the Receiver. It will only illuminate when the Receiver is getting wireless power from the Transmitter. That requires the dome to be parked and the shutter closed.
The MaxDome Charging System requires the Rotation Controller to run Firmware Version 10 or higher, and MaxDome ASCOM driver Version 3.00 or higher. Updates are available on our web site at https://diffractionlimited.com/dome-control-system/; click on the Downloads tab.

The charger is only useful when a shutter controller is installed, so obviously Has Shutter Control must be checked.
We strongly recommend turning on Park Dome Before Operating Shutter. This will force the dome to always park when you close the shutter. The shutter must be closed and the dome parked before the MaxDome Charging System will engage. Otherwise if you close the dome but forget to park it, the shutter battery will not be charged.
In order to enable the charging system, check Enable Parked Charging. When this is selected, whenever the dome is parked and the shutter is closed, the MOTOR 2 relay will be turned on, placing +12V on the MOT2+ output terminal. That will power up the charging system - and disable the communications link to the shutter. Any command to rotate the dome or operate the shutter will automatically disengage the charger and restore communications.
Some dome control systems may not like the shutter showing error status. In that case, you can check Hide Shutter Error. When this is selected, the ASCOM driver will indicate the shutter is Closed whenever the MaxDome Charger is active.
Please note that if you manually open the dome, the MaxDome II system will not know this because the communications link is disabled. If you rotate the dome manually the charger will be disengaged.
The charging feature is turned on when you connect the computer to the MaxDome II system, if it is enabled in Setup. Once that is done, you can manually close the dome and rotate it to the Park position, and the system will activate. Note however that if you power down the Rotation Controller, it will forget the setting until you reconnect the computer.