On the Expose tab, open the Options menu and select Set Image Save Path. This will open a browse folder window. Select a location to save your images; for example, a folder under My Documents. It is usually a good idea to name the folder with today's date, so that images taken on different days go into their own folder.

Make sure the Subframe is turned Off. This will ensure that you capture the entire frame, rather than just a part of it.
Click the Autosave button. This will switch the exposure mode to Autosave and open the Autosave Setup dialog box.
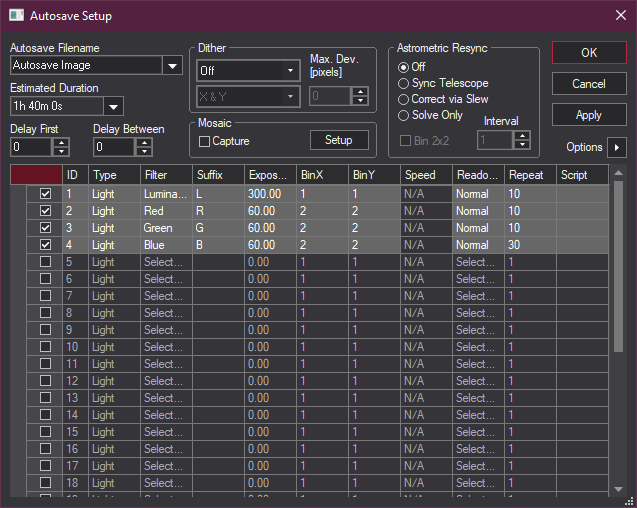
Enter a base file name that identifies your target, such as ”NGC4565”, in the Autosave Filename field. The filenames for Individual exposures taken by the sequence will be composed of this, a unique sequence number, and a suffix. If you have the Observatory Control Panel connected to a telescope, click the drop arrow and select Filename from Observatory Control. The filename will automatically set based on the last object that was slewed to, or if the telescope was not slewed to a particular object name, then the closest object to the telescope position.
Turn Dither, Mosaic Capture, and Astrometric Resync Off.
Set Delay First and Delay Between to 0. Delay Between can be used to provide some extra time between exposures for the autoguider to settle (by default there is a minimum 5 second delay when the guider is running). You can also set a settling criterion based on the autoguider error using the Guide Tab Options menu.
Enable the first four Slots, and disable the rest. This is done by clicking the Slot number buttons. Use the scroll bar at the right side to scroll through all the slots and make sure the remaining ones are disabled.
In the first Slot, set the following:
-
Set Type to Light
-
Set Filter to Red
-
Set Suffix to R
-
Set Exposure to your desired exposure time, in seconds
-
Set Binning to 2
-
If enabled, set Readout Mode to Normal (or as appropriate for your camera model)
-
Set Repeat to the desired number of exposures
-
Leave Script blank (to clear click the ... button and then click None)
Repeat the slot setup for the remaining filters, Red, Green, Blue, and Luminance. You must use a unique Suffix for each. Usually the Luminance exposure is set for no binning and a longer total exposure.
Click OK (or Apply if you want to leave the Autosave Setup window open).
Click Start on the Expose Tab to initiate the exposure sequence.