Starlight Xpress Universal
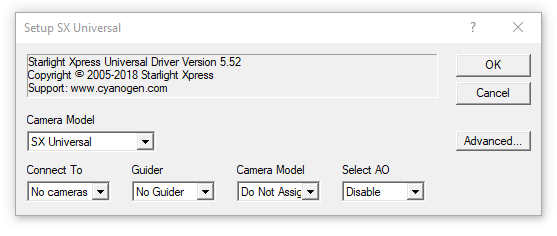
For this driver, please select SX Universal on the Setup tab.
Note: This plug-in is maintained by the manufacturer. Please download the latest version of the Starlight Xpress plug-in and driver file from the their web site at https://www.sxccd.com/support/resources/. The file must be un-zipped and copied into the MaxIm DL program folder. For technical support on this plug-in driver please contact the manufacturer.
Connect To shows a list of the cameras that are currently connected to the PC. Select the camera you wish to connect to. If no cameras appear in the list, make sure the camera is connected and installed, and then close and re-open the camera settings dialog. MaxIm DL scans for connected cameras whenever this dialog is opened.
Guider should be set to No Guider if you are not planning to use this camera for autoguiding. Set it to STAR2000 for MX series cameras when you want to use the STAR2000 single-chip autoguiding. Note that this mode cuts the effective exposure time in half. For cameras with secondary guide heads, set it to Guide Head. You can also select Swapped Head, in which case the main chip becomes the autoguider, and the guide head becomes the main camera.
A special Guider mode, Binned 1x2, is provided for users of MX5 cameras. These cameras have highly rectangular (i.e. non-square) pixels, which are not ideal for autoguiding. When they are binned 1x2 (meaning that adjacent rows are binned together, in the vertical direction) the pixels are much closer to being square.
Note: If using both the main camera and the guide head you must turn on the Dual Chip Mode check box on the Setup tab; this tells MaxIm that the two CCD's are controlled through the same camera driver. If you're using the guide head as a stand alone guider (i.e. only the guide head is connected) select SX Universal as the guide camera on the Setup tab, and set Guider to Swapped Head.
The Camera Model indicates the model that is assigned to the camera when MaxIm DL connects. Normally this is left at Do Not Assign. For older SXV, MX and HX series cameras it can override the camera model. Note that unless the camera is a USB1.1 camera, it will remember the newly assigned model after power is cycled.
Use the Select AO setting to enable control of a Starlight Xpress AO unit. Set this to Disabled if no AO unit is present. Otherwise, select the COM port to which the AO unit was connected. When the driver controls an AO unit, a separate SX AO Control Window will appear.
The cooler controls are available for SXVR cameras with firmware v1.14 or later. Older Starlight Xpress models use open-loop cooling, so the cooler controls are not enabled for these.
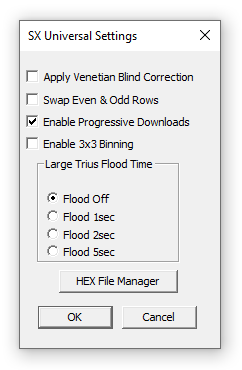
The SX Universal Settings dialog is displayed when you click on the Advanced button of the Setup SX Universal dialog.
Apply Venetian Blind Correction corrects the images from certain cameras, which exhibit a "venetian blind" appearance, which appears as light and dark lines. To compensate for this effect, check the Apply Venetian Blind Correction setting. We recommend turning this off if no venetian blind effect is present.
Swap Even & Odd Rows will reverse the interleaved rows. Certain camera models output the rows in the reverse of the normal order; this switch can correct that.
Enable Progressive Downloads will turn on the progressive download mode, instead of the interleaved download mode. This doubles the effective exposure time, but due to the download time may result in a slightly different exposure for the even and odd rows.
Enable 3x3 Binning turns on an optional 3x3 binning mode.
Large Trius Flood Time - consult the manufacturer for the use of this feature.
The HEX File Manager button brings up the Starlight Xpress Hex File Utility. This is used to configure old USB 1.1 camera models to work with SX Universal. It is not used with modern cameras.
Availability of this feature depends on Product Level.