Select Home / Process / Stacker.
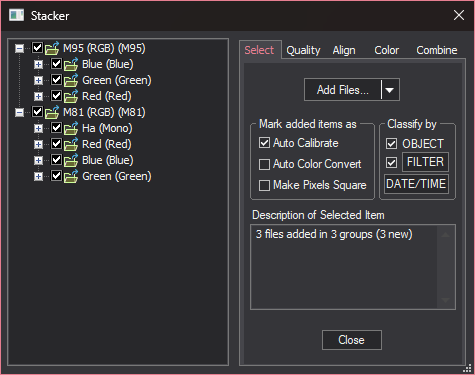
On the Select tab, turn on Classify by OBJECT and FILTER.
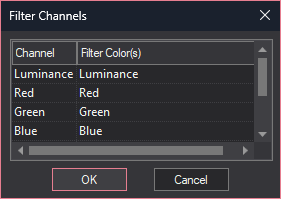
Click the FILTER button to set up the filter mapping. This will determine what filters are mapped into which LRGB color channels. To change a row, click once on the row, then click once on the Filter Color item, and enter a new value. This will make sure that your filters are automatically assigned to the correct group.
If your images have not yet been calibrated, turn on Mark added images as Auto Calibrate. Each image will automatically be calibrated as it is needed, using the settings from the Set Calibration command.
Click the drop list on the multi-function button and select Add Folder. Browse to a folder on disk where your images are located. This folder may contain images of several different targets, as long as the OBJECT FITS keyword is set in each image (during imaging, this is automatically obtained from the Observatory Control Panel if a telescope is connected).
The Tree View on the left side of the Stack dialog will now show all the image files you have selected, arranged into groups according to their FITS header. You can open the groups to view the files by clicking on the + sign. If you would like to view an individual file, right-click it and select Display Image. Alternatively, using the right-click menu select Auto Display, and any image you click on will be automatically displayed.
If necessary, you can move images or entire groups by dragging them. You can set properties for groups or individual files using the right-click menu.
Select the Quality tab. If you would like to eliminate images with out-of-round stars caused by bad tracking, turn on the Roundness check box. The Threshold should be set to limit how far out of round the star can be; for example, 0.1 will throw out any image with stars that are more than 10% out of round. Click the Measure All button, and any bad images will automatically receive an X in the enable box. You can manually override this decision if you like, by changing the enable box.

Select the Align tab. If your images have been solved using PinPoint Astrometry you may wish to use the Astrometric align mode, which is extremely accurate. Alternatively, the Auto Star Matching mode is fully automatic and quite accurate. There are a variety of other alignment modes available, including manual alignment.

You can select one of the images to be the Reference Image, using the right-click menu. This image will not be shifted during alignment; all other images will be aligned to it. If you do not select the reference image, the first image in the list will be used.
Select the Color tab. If you wish to customize the color balance settings you may do so; otherwise click the Defaults button, which assumes 1:1:1 color balance. Also turn on Auto equalize background to remove any background color cast due to sky glow.

Select the Combine tab and set the Combine Method. For large numbers of images we recommend using Sigma Clip; a Sigma Factor of 3 is a good starting point. If you have a modest number of images the SD Mask mode will produce a better result (but will take more time); a good starting point for the settings is a Sigma Factor of 0.5 and a Number of Passes of 3.

Be sure to turn on Ignore Black Pixels. If there are any areas where the images do not completely overlap, this will ignore the contribution from the missing data. Otherwise you may get strips across the edges of the image that look dimmer.
Set Normalization to Linear and set Area to 50%. This setting assumes that any changes in intensity between the images are due to extinction rather than changes in background level. If you have strong background level changes you may want to use Delta-Level instead.
Select whether you want the results created as new images or written to a disk folder using the commands in the Options menu.
Click Go to start the stacking process. This may take some time; you can interrupt and restart the process if needed. If you have multiple image groups, they will be stacked separately. Color sets will automatically be color combined. To view results written to a folder, you must close Stacker before opening them with the Open command. Alternatively, you can simply drag and drop them from Windows Explorer onto the MaxIm DL window.