The Align command is used to align a set of images. Two dialog boxes appear: Select Images followed by Align Images.
Tip: the Stacker can also align images, but has the advantage of being able to work on disk files rather than images in memory. This allows you to align many large images at once.
Select Images
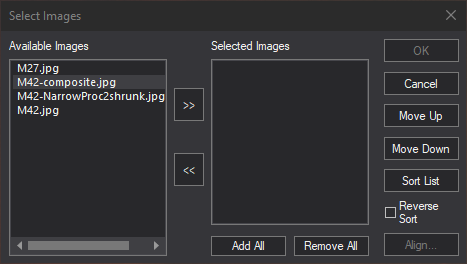
When the command is activated, a Select Images dialog box appears first. It allows you to select the images to be included. Select one or more of the images in the Available Images list on the left using the mouse, then click the ”>>” button to copy them to the Selected Images list on the right. You can also remove images by selecting them on the right and clicking the ”<<” button. Note that ranges of images can be selected using SHIFT-click, and individual images can be picked using CTRL-click.
The Add All button adds all of the Available Images into the Selected Images list, and the Remove All button clears the Selected Images list.
Click OK to start the alignment process. At least two images must be selected before you can proceed.
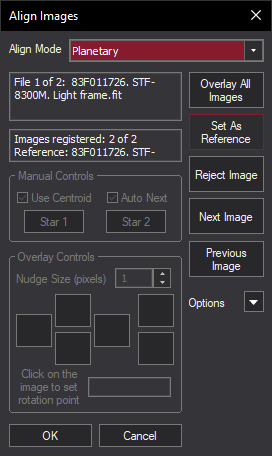
When the Align Images dialog box appears, a special Align image buffer also appears. This image buffer is used to display the contents of the current image while aligning.
The available alignment modes are:
None – no alignment is performed.
Auto - correlation – automatic, performs shift only. A cross-correlation is calculated between the two images to determine the relative offset. If point sources (stars) are available in the image they are used to refine the alignment to sub-pixel accuracy.
Auto - star matching – automatic, performs scaling, shift, and rotation. Star patterns are compared and matching stars are recognized. Centroids are calculated for well-separated stars, and comparison of the positions of the same stars in different frames is used to calculate the alignment. This is the most convenient method for deep-sky images.
Manual 1 star - shift only – manual, performs shift only. The user clicks on the same star in each frame. A centroid is calculated, and the necessary shift is determined by comparing to the position of the star in the reference frame. See below for additional details.
Manual 2 stars – manual, performs scaling, shift and rotation. Same as Manual 1 star, except two stars must be tagged. The extra information obtained permits the calculation of scale and rotation angle. See below for additional details.
Astrometric – automatic, performs scaling, shift, and rotation. Uses World Coordinate System (WCS) information from the FITS header, which is calculated by PinPoint Astrometry. This is the most precise and reliable alignment technique for images containing stars. The images must be already PinPoint solved (tip: use Batch Processing).
Planetary – automatic, performs shift only. Calculates a centroid for the planet as a whole.
Auto one star – automatic, performs shift only. The brightest star in the image is assumed to be the same object in each frame. A centroid is calculated and the offset from the reference frame determines the alignment.
Overlay – manual, performs shift and rotation. Controls are provided to nudge the image in small increments. You can adjust for offset and rotation. The images are overlaid in different colors so you can see when they are improperly aligned. See below for additional details.
The controls for the manual modes are described below.
Manual 1 star - shift only
This is the fastest manual adjustment method. Each image is presented in turn; the user simply clicks on a particular star or other recognizable feature in each image.
In order to speed up the alignment process, turn on the Auto Next check box. Every time the mouse is clicked on the image, the next image will automatically be displayed.
If Auto Next is not being used, you can move through the images using the Next Image and Previous Image buttons.
If the reference point is a star or similar point source, turn on the Use Centroid check box. At each clicked location a centroid will automatically be calculated and used to refine the adjustment to the sub-pixel level.
Manual 2 stars
This method is similar to the Manual 1 star method, but two reference points are used. Each image is presented in turn; the user simply clicks on a particular star or other recognizable feature in each image.
In order to speed up the process, turn on the Auto Next check box. Every time the mouse is clicked on the image, the next image will automatically be displayed.
Start by setting Star 1. Click on the same object in each image. When all the images have been set, the buttons will automatically toggle to Star 2. Move to another object on the image, well separated from the first, and repeat the procedure until both reference points have been set for all images. If you are not using Auto Next, or you need to correct a previous reference point, you can toggle the reference point buttons and use the Next Image and Previous Image buttons as required.
If the reference point is a star or similar point source, turn on the Use Centroid check box. At each clicked location a centroid will automatically be calculated and used to refine the adjustment to the sub-pixel level.
Overlay
This mode is useful when no clear registration points are visible, such as planetary images with indistinct features.
You must first set one of the images as the reference image. Look through the images using the Next Image and Previous Image buttons. Pick an image and click the Set As Reference button (in many cases the first image can be used).
Next, move to another image using the Next Image or Previous Image button. This image will be overlaid on the reference image, with the two images appearing in different colors to make differences obvious. The Overlay Controls can now be used to adjust the position of the image to match the reference.
There are four shift buttons with up, down, left, and right arrows. There are also two rotation buttons with rotate clockwise (right) and rotate counterclockwise (left) arrows. Each time you click a button the image moves. The distance moved is controlled by the Nudge Size (pixels) control. With these controls you can position an overlaid image to a fraction of a pixel.
In order to use the rotation buttons, you must first pick a rotation point. This is the point that the image will pivot about as it is rotated. The best procedure is to align a feature that appears on both of the overlaid images, click Set, then click on the feature. Look at another point in the image some distance away and adjust the rotation to line up the second point.
Options Menu
The Options menu has one entry:
Bicubic Resample – when selected, a bicubic resample algorithm is used for interpolation. When off, a bilinear resample algorithm is used.